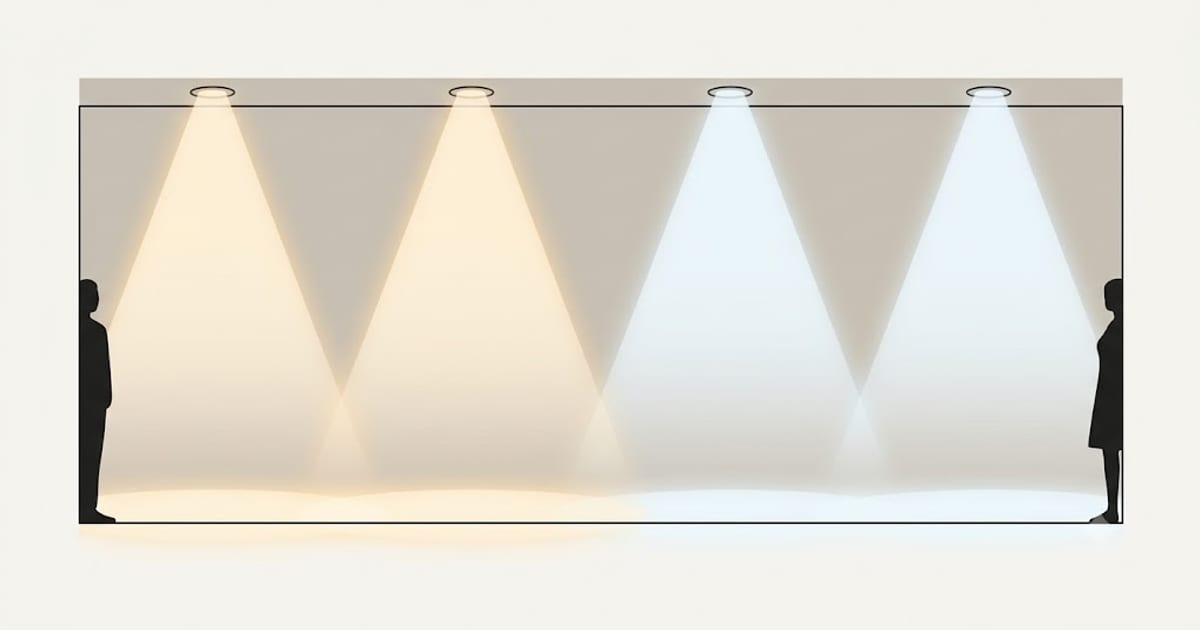
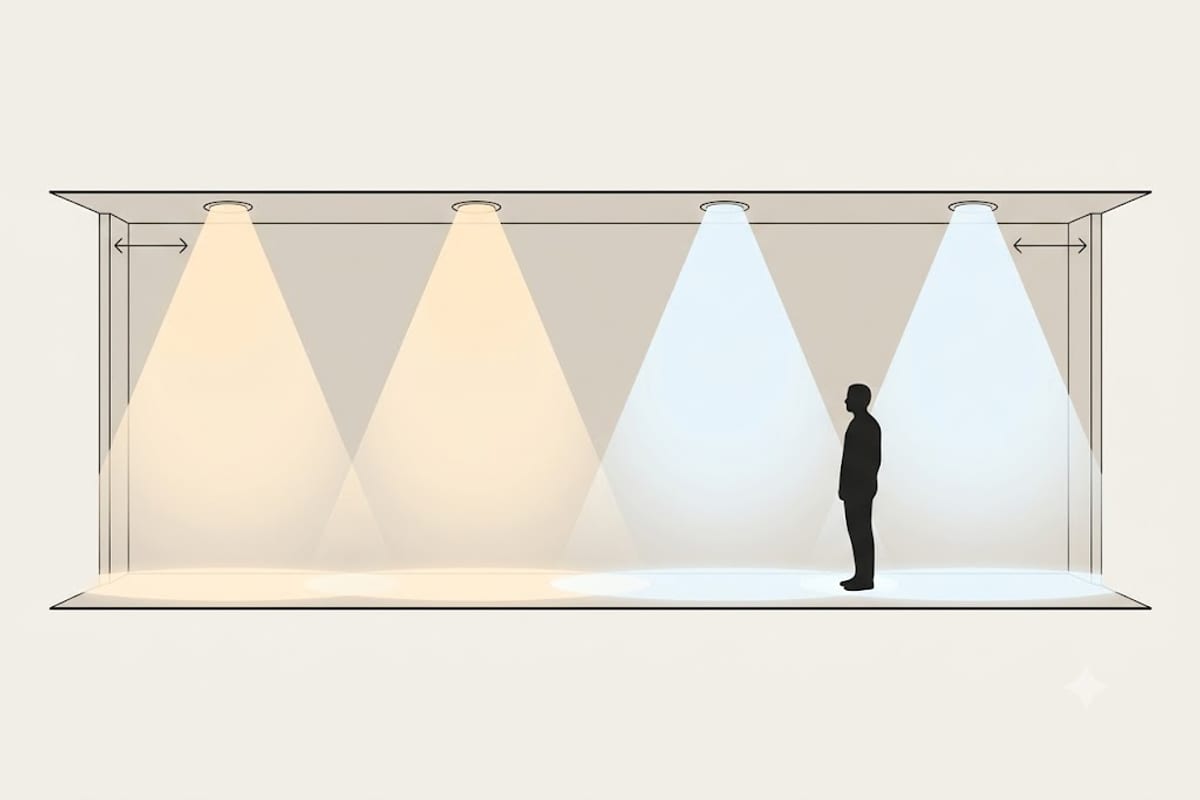
There is one rule, it takes ten seconds, and it is right in most rooms:
Spacing between fittings = ceiling height ÷ 2. Distance from the wall = spacing ÷ 2.
An 8 ft ceiling gives 4 ft spacing and 2 ft from the wall. A 9 ft ceiling gives 4.5 ft and 2.25 ft. A 10 ft ceiling gives 5 ft and 2.5 ft.
Why ceiling height and not room size
A downlight emits a cone. The higher the fitting, the further that cone travels before it reaches the floor, and the wider the circle it makes when it gets there.
Spacing is really asking a different question: how far apart can two circles be and still overlap? Since the circle size is set by the height, so is the spacing. Room dimensions decide how many fittings you need, not how far apart they go.
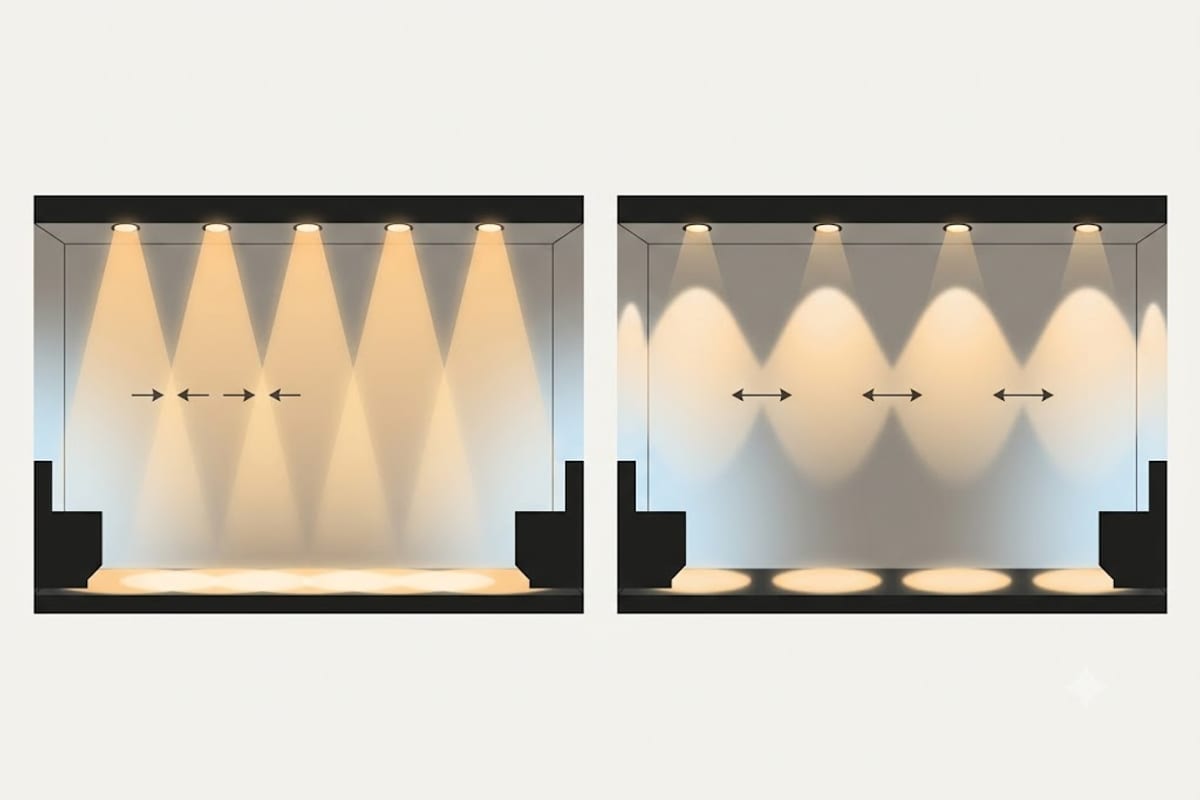
Get it wrong in the wide direction and you get scalloping — bright pools with dark gaps between them, and a row of arcs up the walls.
Working an actual room
Take a 12 × 14 ft room with an 8 ft ceiling.
Spacing is 4 ft, wall offset is 2 ft.
Along the 12 ft wall: 12 − 2 − 2 = 8 ft of run, divided by 4 ft spacing = 2 gaps, so 3 fittings. Along the 14 ft wall: 14 − 2 − 2 = 10 ft of run, divided by 4 = 2.5 gaps. Round to 3 gaps and tighten the spacing to 3.3 ft, so 4 fittings.
That gives a 3 × 4 grid, 12 fittings. Always round to more fittings and closer spacing rather than fewer and wider — a slightly tight grid is invisible, a slightly loose one scallops.
| Ceiling | Spacing | From wall |
|---|---|---|
| 8 ft | 4 ft | 2 ft |
| 9 ft | 4.5 ft | 2.25 ft |
| 10 ft | 5 ft | 2.5 ft |
| 12 ft | 6 ft | 3 ft |
The wall offset does more work than people expect
Two feet from the wall is not arbitrary. It puts the edge of the cone on the wall surface rather than on the floor in front of it, which washes the wall — and a lit wall is the single biggest factor in whether a room reads as bright.
Push the fittings out to the middle of the room and the walls fall dark. The room reads as gloomy even when the floor is well lit, and people respond by adding more fittings in the middle, which makes it worse.
Where the rule breaks
Over a worktop or an island. Task areas are not general lighting. Fittings go directly over the working surface, typically 2–3 ft apart, ignoring the grid. Getting the grid right and then discovering it puts a fitting over the middle of nothing is the most common kitchen error.
With a beam angle far from normal. The rule assumes something like a 60° flood. A 24° narrow spot needs much tighter spacing; a very wide beam tolerates more. Check the fitting.
Very high ceilings. Above about 12 ft the rule gives spacing so wide that each fitting has to be very powerful, and the room ends up with a few intense sources and heavy shadows. Above that height, use fewer downlights and more of something else.
Sloped ceilings. Measure to the point directly above each fitting position, not to the ridge.
Fittings alone will not light a room
A grid of downlights is one layer. It lights the floor and it lights the tops of things. It leaves faces shadowed and the room slightly flat, because all the light arrives from the same direction.
Rooms that look good use downlights for the general layer and add something at eye level — table lamps, wall lights, a floor lamp — for the rest. This costs less than adding more downlights and does far more.
How many lumens across the grid
Spacing tells you where. It does not tell you how much. Work out the room total first from lumens per square foot by room, then divide by the number of fittings the grid produced — that gives the output each one needs.
The room lighting calculator does both at once: pick the room type and size and it returns the total lumens, the bulb count and the recommended colour temperature together.
Rectangular rooms, and how to round
Square rooms are forgiving. Rectangles are where the rule needs judgement, because the two directions rarely divide evenly.
The method is the same in each direction, taken separately:
- Subtract the wall offset from both ends: run = length − (2 × offset)
- Divide by the target spacing to get the number of gaps
- Round the gaps up, never down
- Recalculate the actual spacing: run ÷ gaps
- Fittings = gaps + 1
The rounding step is the whole thing. Rounding up tightens the spacing slightly below the target, which is invisible. Rounding down stretches it above target, which scallops.
| Room, 8 ft ceiling | Run | Gaps (raw) | Gaps used | Actual spacing | Fittings |
|---|---|---|---|---|---|
| 10 ft side | 6 ft | 1.5 | 2 | 3.0 ft | 3 |
| 12 ft side | 8 ft | 2.0 | 2 | 4.0 ft | 3 |
| 14 ft side | 10 ft | 2.5 | 3 | 3.3 ft | 4 |
| 16 ft side | 12 ft | 3.0 | 3 | 4.0 ft | 4 |
| 18 ft side | 14 ft | 3.5 | 4 | 3.5 ft | 5 |
| 20 ft side | 16 ft | 4.0 | 4 | 4.0 ft | 5 |
Note that the two directions end up with different actual spacings — 3.3 ft one way and 4.0 ft the other in a 12 × 14 room. That is correct and nobody notices. Forcing both directions to the same spacing by moving the wall offset is what people try instead, and that is visible, because the border stops being even.
Beam angle changes the spacing more than ceiling height does
The ceiling-height rule quietly assumes a beam angle somewhere around 60°, which is what most general-purpose downlights produce. Step away from that and the rule stops working.
The geometry is straightforward: a fitting at height h with beam angle θ produces a pool of diameter 2 · h · tan(θ/2) at floor level. Wider beam, bigger pool, more overlap at the same spacing.
| Beam angle | Sold as | Pool at 8 ft | Spacing adjustment |
|---|---|---|---|
| 24° | Narrow spot | 3.4 ft | Roughly 0.6 × the rule |
| 36° | Spot | 5.2 ft | Roughly 0.8 × |
| 60° | Flood — the default | 9.2 ft | The rule as written |
| 90° | Wide flood | 16 ft | Can stretch to 1.2 × |
| 120° | Very wide | 27 ft | Spacing set by evenness, not overlap |
The two ends of that table are the practical warnings. A narrow spot on a standard grid leaves obvious dark gaps — this is the most common cause of a correctly spaced ceiling that still looks scalloped. And a very wide beam throws light sideways into your eyes when you are sitting down, which is why wide-beam fittings suit corridors and cupboards better than living rooms.
Fittings, insulation and airtightness
Three things about the housing itself decide whether a correct layout is also a safe and efficient one.
IC rating. A fitting marked IC-rated may be covered by insulation. One that is not must have a clearance around it, typically 3 inches, which means either holding the insulation back — creating a cold spot and a condensation risk — or choosing a different fitting. In a top-floor ceiling this is the specification that matters most.
Airtightness. A non-airtight downlight is a hole from a heated room into a cold loft, and a dozen of them together move a surprising amount of warm air upward. Sealed or airtight-rated fittings cost a little more and stop that.
Fire rating. Cutting holes in a ceiling reduces the fire resistance that ceiling provides between floors. Fire-rated downlights contain an intumescent material that closes the hole in a fire and restores it.
None of these change the spacing. All three can change which fitting you buy, and it is much cheaper to know before the holes are cut.
Sloped and vaulted ceilings
Two adjustments and one warning.
Measure the height at each fitting position, not at the ridge or the eaves. A fitting halfway up a slope is at the height directly above its own position, and the spacing local to it follows from that. The result is that fittings sit closer together at the low end and further apart at the high end, which looks right precisely because the light pools end up the same size.
Use sloped-ceiling housings. A standard housing points straight down out of a sloped ceiling, which aims the beam at the wall rather than the floor. Sloped versions hold the lamp vertical, or gimbal versions let you aim it.
The warning: on a steep slope, do not put a row of fittings near the top. Light from up there travels a long way before reaching anything and lands mostly on the opposite wall. Rooms with a high vault do better with fewer downlights and a pendant or two dropped to a useful height.